Gees, it's been ages since I posted here!
But that is for the simple reason that I have miraculously not broken any of my figures for that entire time (not even Roy)!
... until a couple of weeks ago...
I was playing around with RAH Captain Harlock (the more recent version, not the super old one) when suddenly something went "crack". It's the kind of sound you never want to hear any kind of action figure making, let alone your pricey discontinued 12-incher.
Captain Harlock is now fixed, but I spent, like, an hour getting him into a really cool pose (you know how it is) so for the duration of this blog, I will be using a different model.
Meet RAH Ginko.
He looks a bit apathetic, but he's actually a really helpful chap, and today he's kindly agreed to be an example RAH body for us.
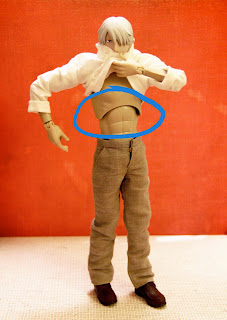
Although the captain didn't seem visibly broken at first, as I continued trying to pose him, the joint in the middle of his torso became mysteriously limp, meaning he was unable to stand straight and, on further inspection, his entire top half could now be removed from his legs (which really isn't normal).
 |
| The problem joint, circled in blue. |
 |
| A normal, upright pose. |
 |
| When broken, Captain Harlock could only slump forward like this. |
 |
| One of the few photos I took during the captain's operation. |
Now, RAHs are complicated things, and I have to admit that what actually broke is still a mystery to me. I couldn't see any obvious breaks, and if anything fell out without me noticing, it must have been practically microscopic, because I searched all around the floor afterwards and I couldn't find anything.
Still, based on a theory I developed after several blunders, I managed to fix the cap'n.
So, the first thing I did after I broke Harlock was take him apart to see if that would shed any light on the matter.
First thing's first, the screws needed to come out.
RAH screws are nicely hidden under little round bits of plastic, but these can (usually) be easily removed with a pointy thing like a very small screwdriver or a knife.
 |
| Observe the five covered screws in Ginko's back. |
I then went to unscrew the screws in the lower torso, but Medicom has for no apparent reason filled the screw-heads in with some sort of paste which is extremely hard and resistant to several very good solvents, so I couldn't take apart the lower torso and had to peer in the hole at the bottom of it instead.
What I saw was a... spring.
A spring?
It seems to be part of a suspension system which gives RAHs their solid feeling whilst also having that awesomely flexible mid-torso joint... I think.
To explain better, here is a diagram of what roughly I think is inside the lower torso of a RAH body, based on what I could see:
The spring seems to regulate the stiffness of the central torso joint.
The tension on the spring, in turn, is regulated by the vertical position of the sticky-outy bit on the central peg (black) within the spring coils.
When the tension on the spring is wrong, the figure slumps.
I think it is the theoretically existent sticky-outy bit which broke off, because there was no such thing visible by the time I took Captain Harlock apart and such a thing would be needed to make sense of the mechanism I could see inside the lower torso.
It would also have to be extremely small, which could explain why I couldn't find anything which could have broken.
So to fix it: I drilled a hole into the central peg on the smudge and pushed a tiny itty bitty short piece of wire into the hole, making a new sticky-outy bit.
 |
| I drilled the hole using a pin vice, which I finally got around to buying. Use a drill bit the same width as your wire, or as close as possible. The wire I use has a 1.25mm diameter. |
I didn't even glue the bit of wire in, because I was just testing a theory, but once fixed, he didn't want to come apart again, so I just left him that way. (That's why there are no photos of the fixed part or the underneath of the torso.)
Anyway, so yeah. Captain Harlock is fixed and I hope that made some kind of sense and wasn't too confusing. Even I am still a little confused.
If you have the same problem as I had and something here doesn't make sense, please feel free to email me for clarification: sparkeydavis@yahoo.com
well! My post is at an end!
As always, good luck with your repairs!
Cheers! Sparkey


No comments:
Post a Comment